I prefer to have some type of closure on my bags so I thought a recessed zipper would be neat. I didn’t actually try one out until my coworker said that she wanted a basic reversible tote, but with a zipper. You probably remember that I attempted it a few times before coming up with something that I was satisfied with. See the attempts here, here, and here.
Continue reading for the tutorial. I’m going to tell you how I did it, but you should easily be able to adjust for any bag that you want to add the recessed zipper to. I have yet to try it on a curved bag, but when I do, I will be sure to let you know how it went.
Recessed Zipper Tutorial
I’m going to start with the tutorial for my bag, then at the bottom, I will explain the calculations that I used. So then you can determine the size of the pieces for any bag that you want to add a recessed zipper to.
My bag pieces were 13 1/2” across the bottom and 14” up the side. I boxed my corners at 3”, which is actually 1 1/2” down from the corner when you are boxing them. I also used a 1/4” seam allowance throughout, except for top stitching which is more like 1/8”. My zipper was extra long, but it needs to be at least the width of your bag.
Cut
Outside Pieces (2): 13 1/2” x 14” Straps (2): 4” x 22” Zip Ends (2): 4” x 3” Zip Casing (4): 11 1/2” x 1 1/2” Top Lining Pieces (2): 13 1/2” x 2 1/4” Bottom Lining Pieces (2): 13 1/2” x 12 1/4”
Zip Casing
Take the zip casing pieces and fold the short ends under 1/4”.
With the zipper teeth face up and the casing piece right side down, sew 1/4” from the edge to attach the zipper to the casing. Be sure to lock your stitch!
Here you can see where to sew. Also, you may notice that my zipper is extra long. I just buy long zippers and then cut them down to size for whatever project I’m working on. That way, I always (at least almost always) have a long enough zipper.
Repeat with the other casing piece, but with the teeth down. Be sure to line up the casing edges (not shown in the above picture), because it will be noticeable in the finished bag if they are not lined up.
Iron the casing pieces open.
Repeat the last three steps with the other side of the zipper. Again, be sure to line up all of the edges of the casing pieces.
Top stitch the inside of the zipper casing (the part near the zipper).
Sew across the ends of the casing. I originally sewed all the way across in order to stop the zipper, but decided that the zip ends would make a better stop for the zipper so I suggest to just sew each casing end together for a finished look.
Zip Ends
Press long sizes in by 1/4″ and fold in half with short sides touching.
Unfold
Fold in short sides with raw edges toward the middle
Fold in half so that the raw edges are encased in the middle. This is pretty much like you would make a strap.
Then fold the whole thing in half with the short sides touching.
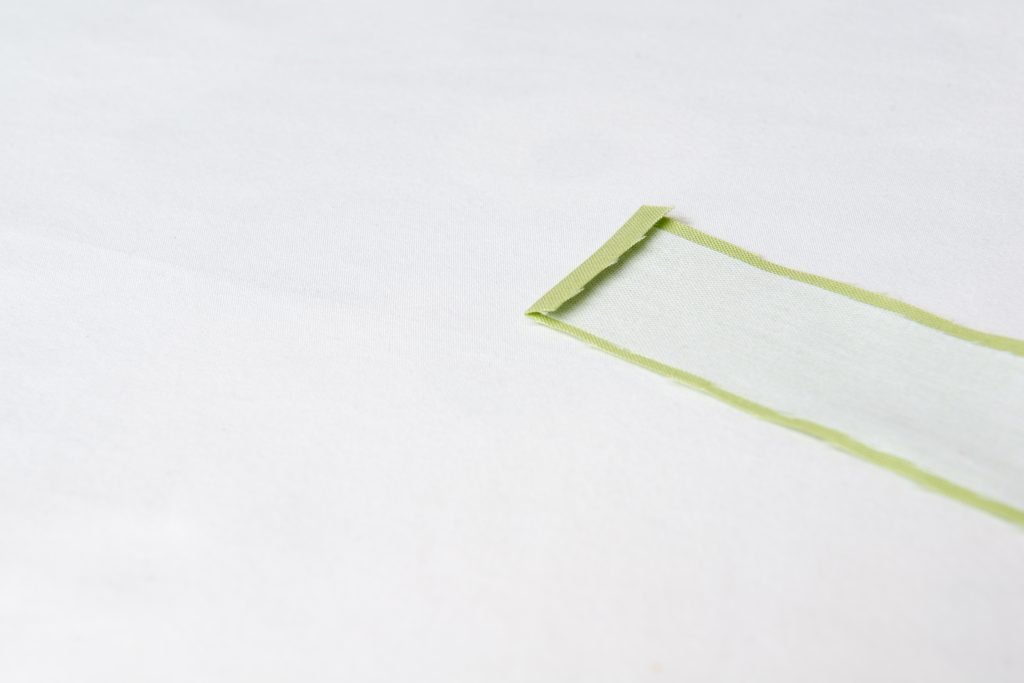
Cut the end of the zipper so that it’s about 1 1/8” longer than the zip cover.
Place over the zip end and sew onto each end of the zipper.
The zipper is now complete! You can see in this picture where I sewed all the way across the zipper to stop it from opening any farther, but I ended up taking out those stitches so that the zipper end could serve the same purpose. Then, you get a slightly wider opening for the zipper.
Attach the Zipper Casings
The hardest parts are done!
Take one bottom lining piece (the large piece) and place right side up, and center the zipper with teeth face up across the top. Place the top lining piece (small piece) right side down and pin everything together. Sew using a 1/4” seam allowance across the top.
Press with the zipper down and top lining piece up, and then press again with the zipper up toward the top lining piece.
Now you can start to tell how the recessed zipper is away from the lining. Repeat for the other edge of the zipper and the two lining pieces. Be sure that the first pieces sewn together are not in your seam allowance. Press as before.
Here you can see the lining pieces laying flat.
Sew the lining pieces together like you normally would….right sides together, along the sides and bottom. Be sure that the zip ends are not in the seam allowance. Box your corners like normal as well.
Here is what it will look like when it’s turned right side out, but remember, lining pieces are actually with the wrong side facing out. The top of the top lining piece is what you will sew to your outer bag. Everything is pretty much the same as it would be if you didn’t have the zipper included.
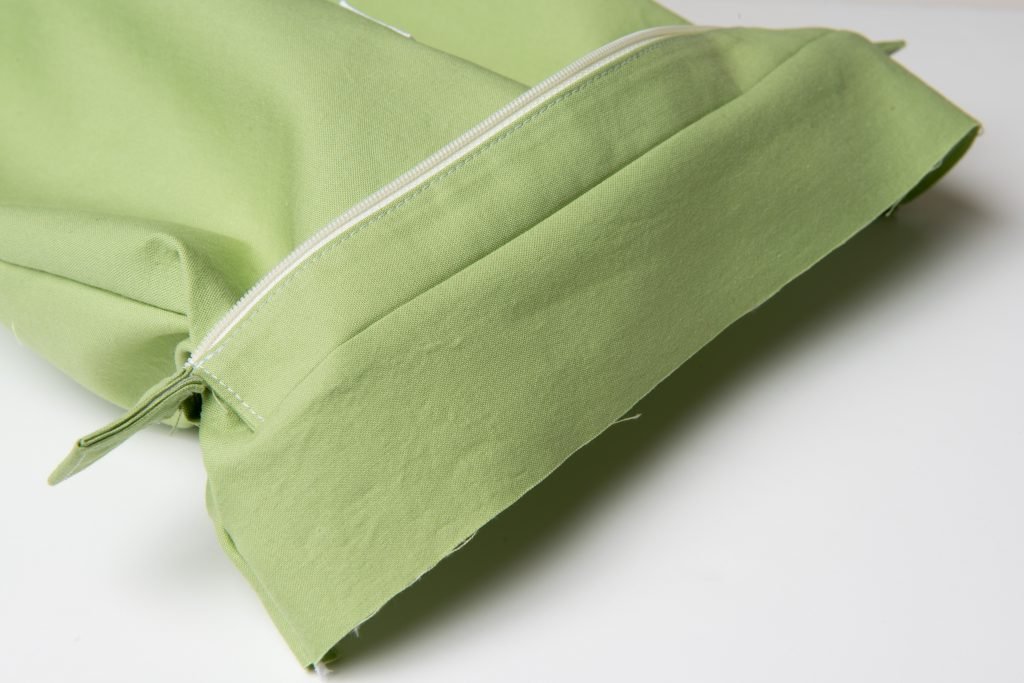
Sew your bag lining to the outer piece (don’t forget your straps), turn right side out, iron, top stitch, and see your recessed zipper. Here, you have two options, either leave the zip ends loose, or you can sew them to the edge of the bag like I did.
All I did was make the zip end even with the top of the bag and centered with the side seam. Then I sewed the zip end to the bag.
This picture is before I attached the zip end.
Calculations
First I’m going to start with some general information that you will need.
You will want a zipper that is at least 2.5 inches longer than your bag width.
The recessed zipper will become part of your lining, so the outer pieces of your pattern should stay exactly the same as written.
The lining fabric will include the zip casing, the bottom and top of the lining and the zip ends.
Since my bag had boxed corners, I decided that the zipper area should be the same width (3 inches).
My outer bag pieces are 13.5 x 14 with a 3 inch completed boxed corner (this means that I sewed my line 1.5” down from the corner)
Zip Casing (2): 2 inches shorter than your bag width (11.5”) and half of your finished boxed corner width (1.5”).
To figure out the bottom and top of the lining pieces you have to consider your seam allowance. I tend to use 1/4” seam allowance, but this should work with a larger one.
Top Lining Pieces (2): Take your total lining piece (13 1/2 x 14) and determine how far down you want the zipper to be. I chose 2 inches and it’s just about perfect in my opinion. I actually wouldn’t go much farther down than that because then you will lose too much of your bag space.
Make the top lining pieces the original width (13 1/2”) and then add your seam allowance (1/4”) to the distance that you chose to lower your zipper (2”). So my top lining pieces were cut to 13 1/2” x 2 1/4”.
Bottom Lining Pieces (2): You will also keep the bottom lining piece the original width (13 1/2”). For the height, take your total original height (14”) and add your seam allowance (1/4”) then subtract your distance that you chose to lower your zipper (2”). So my bottom lining pieces were cut to 13 1/2” x 12 1/4”.
To double check your top and bottom lining pieces, add the heights (2 1/4”, 12 1/4”) and they should equal your original height plus two seam allowances (1/4” + 1/4” = 1/2”). As you can see, my original height is 14” + 1/2” = 14 1/2”, and 12 1/4” + 2 1/4” = 14 1/2” so my calculations are accurate.
I hope this all makes sense and that you are now able to add a recessed zipper to any bag. As always, if you have any questions just let me know.
Share this post
82 Responses
I’ve been wanting to do this but didn’t know how to start. Thanks so much for posting this. A tote with a zippered top will be my next project.
This is amazing and exactly what I was looking for! Your instructions are clear and photos very helpful. I’m so glad I found your tutorial and can’t wait to put it to use on my bags. Thanks so much for taking the time to share this information.
Hi April,
Great tutorial. I’ve been trying to figure this out and now I get it. Thank you.
A couple of notes:
1. I’m wondering why you separated your lining into two parts. I’m thinking of just marking a line down from the top of the one-piece lining and and sewing the hemmed casing onto it with the zippered casing edge turned down into the bag. It won’t show under the casing and seems like less work. Is there some other reason for inserting the zipper casing between the two lining parts that I should consider?
2. I’m also thinking that the zipper ends might just as well turn down into the bag rather than up and then there is no need to secure them or have them interrupt the lining around the inside perimeter of the bag.
Thanks for a very informative tutorial and I look forward to doing this on a bag I’m working on right now.
Yeah, it should be possible. I would just suggest making the pieces around the zipper like you would make a strap. That way all raw edges are in the middle. Then you would sew to the lining. I have not made it this way so I’m not 100% sure how it would work, but you could try it on some scrap fabric.
This is absolutely the BEST RECESSED ZIPPER TUTORIAL!! I’ve looked at several, and I believe yours has the most concise directions and clearest photos. I thank you so much for posting this, April. I’ve been trying to figure this out on my own and have a bag just waiting for the zipper. Now I can finish it. Hooray!
Hi
Greetings from Delhi, India.
Found your beautiful tutorial via pinterest.
Thanks so much. This is exactly what I was looking for to add to the purse that i am making now. I went through so many tutorials to get it right, your is the best. You made my day.
Thanks again.
I just completed my lining this evening. What a fabulous tutorial! I have been wanting to learn how to put zippers in my tote bags for a couple of years. I have had a few fails – – this works and is so simple to do! Thank you so much for sharing! 🙂
Hi April, thanks for your tutorial was really helpful…..i wrote a post on my blog about a bag that i made and i used a picture with a link to your tutorial….http://lecosedibibbi.blogspot.it/2014/03/borsa-jeans.html
hope is fine for you….thank you again for your precious work…Barb
Hey April,
I love your tutorial. It cracked me up reading you are yet to try it on a curved bag because that is the reason why I am browsing the internet. My Mom and I sew and sell curved reversible bags online and Iots of customers ask for Zippers. So we’ve been trying to find out the most efficient way to sew in a Zipper in our curved bags. So far we tried inserting the Zipper case on the top when putting in and outside together or I cut the lining Piece 5 cm below the top, insert casing without Zipper sew regular way and the when reversible bag is finished sew in the Zipper. If you’ve found an easy solution, I would be curious to hear. : )
Greets from Lake Constance, Germany…@lex
Hello and thank you for your wonderful tutorial!
I’m wondering about the curved tops too, and am really curious to hear if anyone has any good tips and tricks for these 🙂
This tutorial is fabulously helpful. But might there be a small error? In the Zip Ends section you wrote “Cut the end of the zipper so that it’s about 1 1/8” longer than the zip cover.” Should that have read “1/8″ longer”, not “1 1/8″ longer”?
I have tried this technique many ways and your method is by far the best I’ve seen. It finishes so neatly and is very adaptable. Thank you for the tutorial!
Thanks for taking the time to do this tutorial. Your instructions are so clear and easy to follow. I made my bag and and am very happy with the result. Cheers to you
Hi there! Great tutorial! I have a couple of questions. 1. I am having trouble visualizing how the straps don’t get in the way of the zipper when the bag is reversed. 2. Is it possible to do this with no lining? I would like to make a bag out of a woven fabric that has equally beautiful front and back sides, but I don’t have enough of it to make a lining. Thank you so much!
I just cannot believe i finally got the tutorial for recessed zippered bag.You have just simplified it the easiest way as possible.I am so thank ful to you.You are just too awesome to share it:)
Hello admin, your blog is incredible i know very useful tool for every site owner
(for content creation and SEO). Simply type in google for:
Stoonkel’s Rewriter
First, I use #5 separating zippers for my recessed zippers. Regular garment zippers don’t hold up nearly as well. The separating factor allows the zipper to completely drop down the sides.
Hello! I am a novice sewer and your recessed zipper tutorial was great! The zipper turned out perfectly. I am now completely confused as to how to sew the outer fabric on. Do you have any advice?
Vielen Dank für diese ganz tolle Anleitung und die Fotos! Hierauf habe ich schon lange gewartet, und diese Anleitung hier hat mich ermutigt, so einen Reißverschluss in eine selbst entworfene Tasche einzuarbeiten. An einem Ende jedoch habe ich den Reißverschluss nicht mit einem “zip end” versehen, sondern die Spiralenden getrennt rechts und links in das zip casing eingeschlagen mit einzunähen, so dass man den Reißverschluss hier ganz weit öffnen kann und die Tasche ebenfalls: Das Hineinstecken der Dinge ist somit leichter als im oben angegebenen Beispiel. Danke!
I understand the pieces for the zipper, but the longer pieces…are they the width of the bag? Are they the same width as the pieces attached to the zipper? I’m finding the reference to the lining fabric confusing. The width of my bag front and back pieces is 16 1/2″.
Thank you so much for posting . I have been trying to find a written Tutorial for this recessed Zipper bag for a long time. The instructions are very clear and easy to follow . This is very exciting for me . I have made Tote bags but have not tried the recessed zipper which I think is so neat. Thanks … Kay
I saw a tote for sale on Rakuten or another similar site that had a recessed zipper, and when I zoomed in for a closer view to figure out methodology, I was SMACKED upside the head!!! So so simple! You might give it a go. I just finished a bag for my daughter using this method, I will take a pic and attach an online link to view.
All they did was box the corners of the recessed zipper “case”!!! The “case” is cut the same length as your tote, then box the corners using the zipper as your line through the center of your boxing triangle, and sew across to the desired length you want each corner to be… not well worded, but imagine your zipper casing is the bottom of a very shallow tote, box corners, flip inside out, and the bag shell inside out, sew as usual, leaving zipper open to flip back rightside out, Topstitch about 1/2 inch down to hide seams. Add another Topstitch to the top edge if desired.
Like I said, I’ll post a pic, when you see it, you will totally be able to see how it was done. I wouldn’t recommend this method for purses, but for totes it’s great!
Here is the photo I took of my recent bag- my first try using this “boxed corner” method. I’m sure there’s probably another name that is correct, but I don’t know it! Ignore messy stitches please! My machine has been acting up! https://flic.kr/p/RrHY5P


82 Responses
I’ve been wanting to do this but didn’t know how to start. Thanks so much for posting this. A tote with a zippered top will be my next project.
Hi April! I’m truly inspired by you. What a neat job! I just started sewing and I hope in a year’s time I will be as good as you.
Thank you so much for the tutorial – exactly what I’ve been looking for. I’ve just used it for a Christmas gift to my Mum.
Absolutely the best zipper tutorial anywhere. Thanks for all the time and effort that you put into its creation.
This is amazing and exactly what I was looking for! Your instructions are clear and photos very helpful. I’m so glad I found your tutorial and can’t wait to put it to use on my bags. Thanks so much for taking the time to share this information.
Hi April,
Great tutorial. I’ve been trying to figure this out and now I get it. Thank you.
A couple of notes:
1. I’m wondering why you separated your lining into two parts. I’m thinking of just marking a line down from the top of the one-piece lining and and sewing the hemmed casing onto it with the zippered casing edge turned down into the bag. It won’t show under the casing and seems like less work. Is there some other reason for inserting the zipper casing between the two lining parts that I should consider?
2. I’m also thinking that the zipper ends might just as well turn down into the bag rather than up and then there is no need to secure them or have them interrupt the lining around the inside perimeter of the bag.
Thanks for a very informative tutorial and I look forward to doing this on a bag I’m working on right now.
Michael
Is it possibly to do with one piece lining?
Yeah, it should be possible. I would just suggest making the pieces around the zipper like you would make a strap. That way all raw edges are in the middle. Then you would sew to the lining. I have not made it this way so I’m not 100% sure how it would work, but you could try it on some scrap fabric.
This is absolutely the BEST RECESSED ZIPPER TUTORIAL!! I’ve looked at several, and I believe yours has the most concise directions and clearest photos. I thank you so much for posting this, April. I’ve been trying to figure this out on my own and have a bag just waiting for the zipper. Now I can finish it. Hooray!
This is great! I came here from Pinterest and wanted to tell you that this is a very nice clear tutorial! Thank you for taking the time to write it!
Thank you so much! I’ve been looking for something like this and you’re instructions are very clear.
Thanks a lot – I’ve just finished my first perfect recessed-zipper-bag!
A great tutorial.
Perfect tutorial, thank you so much!!!
Thanks so much…exactly what I was looking for to add to the purses I make since someone wanted me to attach a zipper. Appreciated.
Very generous of you. Thank you lots!
very clean tutorial !!..liked it very much 🙂
Hi. Thank you for your explanation. However, is it possible for you to translate your tutorial in French? Thanks! Pauline
Unfortunately I do not know French. Maybe use google translator or another online translator?
Great tutorial, best one I have read. Thank you! Worked perfectly.
Thank you very much for this tuto. I was in a great difficulty to finish a tote with zipper, and I find you, then pin it. You made a great work!
I hope it works out for you! Thanks for the kind comment.
Thank you so much! This was a much needed tutorial.
Fabulous tutorial! Thank you for sharing! I have included your link in my round up today! http://lanettascreations.blogspot.com/2013/09/scary-zippers.html#.UihcpsasiSo
Hi
Greetings from Delhi, India.
Found your beautiful tutorial via pinterest.
Thanks so much. This is exactly what I was looking for to add to the purse that i am making now. I went through so many tutorials to get it right, your is the best. You made my day.
Thanks again.
This is the clearest tutorial for a recessed zipper I have found! Thank you so much!
I just completed my lining this evening. What a fabulous tutorial! I have been wanting to learn how to put zippers in my tote bags for a couple of years. I have had a few fails – – this works and is so simple to do! Thank you so much for sharing! 🙂
Your tutorial is detailed. Thanks a ton for sharing!!
This was extremely helpful. Thank you for taking the time to make this tutorial!
Hi April, thanks for your tutorial was really helpful…..i wrote a post on my blog about a bag that i made and i used a picture with a link to your tutorial….http://lecosedibibbi.blogspot.it/2014/03/borsa-jeans.html
hope is fine for you….thank you again for your precious work…Barb
i am gonna try this tutorial. it looks complicated, but neat. Love it, thanks for sharing.
Hey April,
I love your tutorial. It cracked me up reading you are yet to try it on a curved bag because that is the reason why I am browsing the internet. My Mom and I sew and sell curved reversible bags online and Iots of customers ask for Zippers. So we’ve been trying to find out the most efficient way to sew in a Zipper in our curved bags. So far we tried inserting the Zipper case on the top when putting in and outside together or I cut the lining Piece 5 cm below the top, insert casing without Zipper sew regular way and the when reversible bag is finished sew in the Zipper. If you’ve found an easy solution, I would be curious to hear. : )
Greets from Lake Constance, Germany…@lex
Hello and thank you for your wonderful tutorial!
I’m wondering about the curved tops too, and am really curious to hear if anyone has any good tips and tricks for these 🙂
Best wishes!
This tutorial is fabulously helpful. But might there be a small error? In the Zip Ends section you wrote “Cut the end of the zipper so that it’s about 1 1/8” longer than the zip cover.” Should that have read “1/8″ longer”, not “1 1/8″ longer”?
I have tried this technique many ways and your method is by far the best I’ve seen. It finishes so neatly and is very adaptable. Thank you for the tutorial!
Thanks for taking the time to do this tutorial. Your instructions are so clear and easy to follow. I made my bag and and am very happy with the result. Cheers to you
Thank you very much for this clear instructions. But I want to know what is the size of the bag after you finish.
Great tutorial!
Hi there! Great tutorial! I have a couple of questions. 1. I am having trouble visualizing how the straps don’t get in the way of the zipper when the bag is reversed. 2. Is it possible to do this with no lining? I would like to make a bag out of a woven fabric that has equally beautiful front and back sides, but I don’t have enough of it to make a lining. Thank you so much!
otima dica… Obrigada por compartilhar….
Abraços do Brasil
I just cannot believe i finally got the tutorial for recessed zippered bag.You have just simplified it the easiest way as possible.I am so thank ful to you.You are just too awesome to share it:)
Hello admin, your blog is incredible i know very useful tool for every site owner
(for content creation and SEO). Simply type in google for:
Stoonkel’s Rewriter
First, I use #5 separating zippers for my recessed zippers. Regular garment zippers don’t hold up nearly as well. The separating factor allows the zipper to completely drop down the sides.
2nd. This is a really good tutorial. Thanks.
Hello! I am a novice sewer and your recessed zipper tutorial was great! The zipper turned out perfectly. I am now completely confused as to how to sew the outer fabric on. Do you have any advice?
Thanks so much for putting the time in to create share such a great tutorial, zippers will never intimidate me again!
Thank you very much for this excellent tutorial. I’ll put a link on my blog.
Vielen Dank für diese ganz tolle Anleitung und die Fotos! Hierauf habe ich schon lange gewartet, und diese Anleitung hier hat mich ermutigt, so einen Reißverschluss in eine selbst entworfene Tasche einzuarbeiten. An einem Ende jedoch habe ich den Reißverschluss nicht mit einem “zip end” versehen, sondern die Spiralenden getrennt rechts und links in das zip casing eingeschlagen mit einzunähen, so dass man den Reißverschluss hier ganz weit öffnen kann und die Tasche ebenfalls: Das Hineinstecken der Dinge ist somit leichter als im oben angegebenen Beispiel. Danke!
I understand the pieces for the zipper, but the longer pieces…are they the width of the bag? Are they the same width as the pieces attached to the zipper? I’m finding the reference to the lining fabric confusing. The width of my bag front and back pieces is 16 1/2″.
Would it be okay to use interfacing to stiffen the fabric?
Excellent tutorial. I’ve completed 2 projects now and both have been successful. Thank you!
Thank you so much, just what I was looking for
Thank you so much, just what I was looking for
Thanks for this great tutorial. .
Thank you so much for posting . I have been trying to find a written Tutorial for this recessed Zipper bag for a long time. The instructions are very clear and easy to follow . This is very exciting for me . I have made Tote bags but have not tried the recessed zipper which I think is so neat. Thanks … Kay
Could you please tell me what the finished bag size is?
Thanks so much for your great tutorial! I’ve finished my bag today, and I am so happy with it.
I saw a tote for sale on Rakuten or another similar site that had a recessed zipper, and when I zoomed in for a closer view to figure out methodology, I was SMACKED upside the head!!! So so simple! You might give it a go. I just finished a bag for my daughter using this method, I will take a pic and attach an online link to view.
All they did was box the corners of the recessed zipper “case”!!! The “case” is cut the same length as your tote, then box the corners using the zipper as your line through the center of your boxing triangle, and sew across to the desired length you want each corner to be… not well worded, but imagine your zipper casing is the bottom of a very shallow tote, box corners, flip inside out, and the bag shell inside out, sew as usual, leaving zipper open to flip back rightside out, Topstitch about 1/2 inch down to hide seams. Add another Topstitch to the top edge if desired.
Like I said, I’ll post a pic, when you see it, you will totally be able to see how it was done. I wouldn’t recommend this method for purses, but for totes it’s great!
Here is the photo I took of my recent bag- my first try using this “boxed corner” method. I’m sure there’s probably another name that is correct, but I don’t know it! Ignore messy stitches please! My machine has been acting up!
https://flic.kr/p/RrHY5P
Here is a bag that also uses this same method, scroll through the photos at the top of page, maybe this is more clear…
https://www.newchic.com/crossbody-bags-3610/p-1296361.html
Such a great tutorial..helps me a lot
Thank you for this pattern. its something i have longed to learn for long, thank u
Thank you so much for taking the time and effort to explain this!
Muito obrigado por esse tutorial, muto bem explicado, me ajudou a tirar dúvidas e fazer o que queria.
Thank you! I’ve been trying to find a simple way of doing a recessed zipper on a purse and it came out beautifully. Great tutorial!
Can you please show in detail the calculations for the zipper casing cut length? (11 1/2”). Thank so happy to find this tutorial.
Clear, concise, free…what more can we ask for? THANK YOU!
I have saved ur tutorial for a long time.
Every time l follow ur steps. This gives my projects a finished look.
Thank u very much