I purchased the pleated wristlet pattern from Michelle Patterns awhile ago. For some reason I just never got around to trying it out. When I saw that she was having her annual DIY for the Holidays sale, where every pattern is on sale for $5, I knew that I wanted to make one and do a pattern review for everyone.
To sum it up, the final product is as cute as the pattern pictures show. It’s a pattern for intermediate sewers, but if you are up for a challenge then a confident beginner could probably follow the directions and still have success. Overall, the directions are easy to follow, but there are a few parts that are difficult to understand. If you want more details then continue reading.
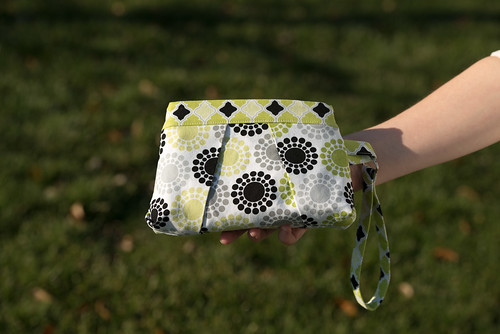
This pattern has three sizes to choose from and I decided to make the small size. I like the size, but the opening is pretty small so it’s hard to see what you have inside. Since it’s a wristlet, that really isn’t an issue since it most likely won’t be completely full. It’s small enough that you could also fit it into a larger purse or bag (like the diaper bag). I didn’t try, but I’m guessing you can fit a cell phone, license, lipstick/chap stick, and keys without any issue.
I chose to use two fabric patterns for the outside (my fabric is from Hobby Lobby) to give it a little more eye appeal beyond the pleats. I really like the way it turned out and how the fabric on top adds a little something. I am definitely going to be using this fabric for something else…I’m just not sure what it will be.
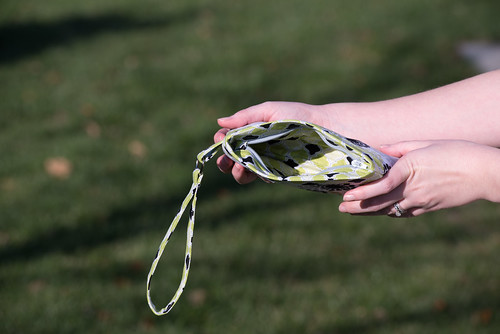
The pattern calls for muslin and batting so that the lining piece can be quilted. I didn’t have muslin so I used white quilting cotton and I also used Warm and Natural for the batting. For the fusible interfacing, I used Pellon SF101 like I use for everything. All of these worked out just fine, but for the small size something a little less fluffy might be a better choice than the Warm and Natural. I do like the added structure though. Also, you could easily not quilt the lining and just use fusible interfacing. There would be less structure to the wristlet, but it would be fine.
Michelle put that the pattern is for intermediate sewers and I would have to agree. There were a few difficult parts, but the pleats are not one of them. Pleats are actually very easy to do if you can understand how to fold them. Michelle included fold lines, so with this pattern it is no issue.
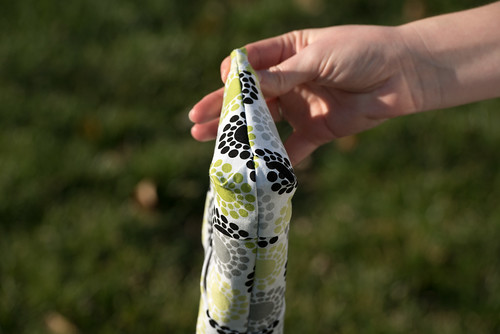
If you have no sewing experience, I think it would have been confusing to follow the directions on how to “box” the outside piece. Honestly, I’m not 100% sure that I completely understood it, but it looks right, so I must have done it correctly. I wish I would have taken pictures while I was sewing the outside corners, so I could show you, but of course, I didn’t. Sorry about that!
The zipper was easy to install, but mine did seem to become a little wobbly after I completely finished the wristlet. It doesn’t affect it in any way, other than the way it looks when it’s closed. On a good note, no one will really see the zipper, so it’s not an issue at all.
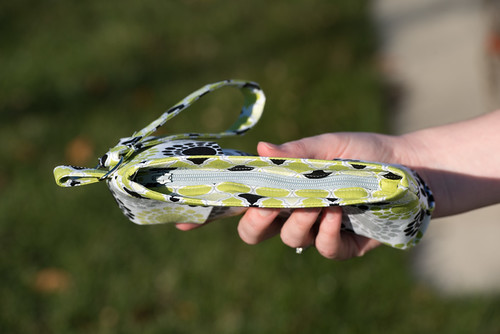
For the strap, it calls for an O-ring, which of course, I didn’t have. I could have waited and sewn the strap on later, but I wanted to finish the wristlet so I just used a D-ring. I don’t think it looks as nice as an O-ring would, but it doesn’t look bad either.
Speaking of the strap, the pattern has you sew around the edges when the pieces are right sides together and then take part of a seam out so you can add the strap. Instead of that extra step, I just pinned the strap in place (with the strap between the two pieces of fabric and raw edges toward the outside) and then sewed the edges. If you have made a pouch/wristlet/something similar, you should understand what I’m talking about.
Overall, I really like this wristlet. There were a few parts where it took me a little while to figure out what to do, but after reading it a few times, I figured it out. I really think that a few more pictures included in the pattern would have helped. Now that I have made it once, it will be easy to make more.
These would make adorable bridal party gifts and are perfect for more formal events where you still need a few essentials, but don’t want to take a large purse. I think the pleat adds something to it to make it seem more formal. I don’t think it’s only for formal events though. I will probably use mine when I don’t need my purse, but want to take more than just my license.
If you have any questions about the pattern I would love to help answer them. If I can’t, then I’m sure that Michelle would be willing as well. Be sure to check out her shop to see if there are any other patterns that you might like. Now is the time to buy since all patterns are on sale for $5 through Sunday, November 25th.
What Michelle Patterns patterns have you sewn? I hope everyone has a great Thanksgiving!


One Response
super cute! it looks great with the 2 different types of fabric.